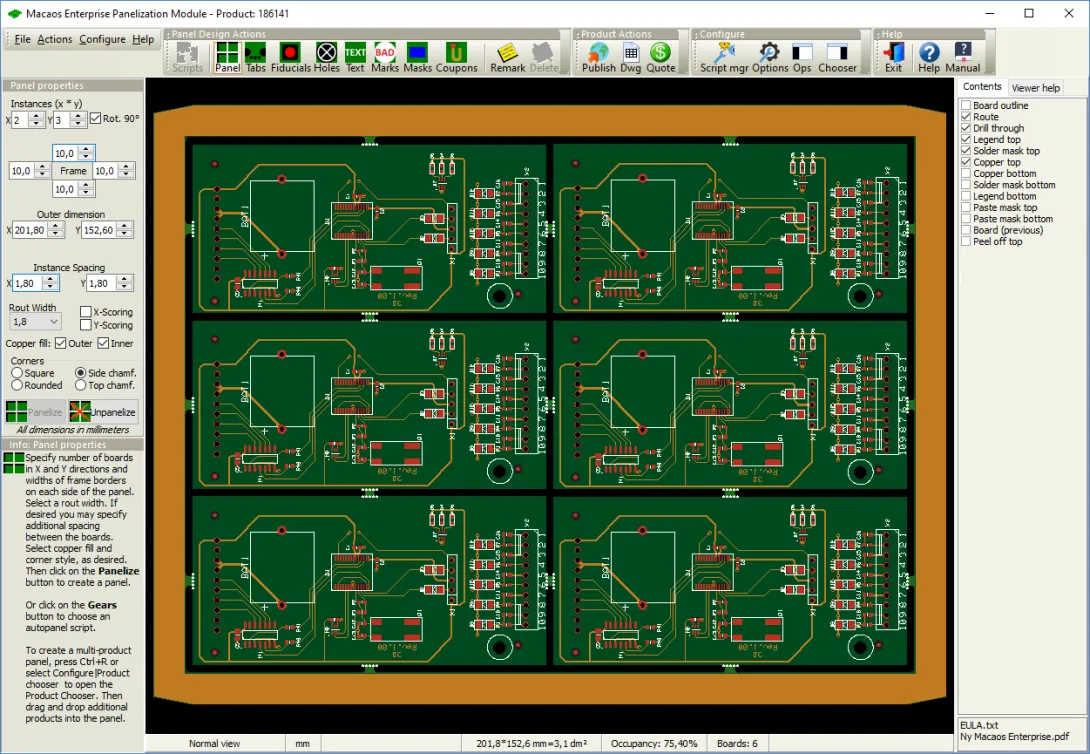
The Panelization Module creates a production-ready PCB panel from an existing PCB product. The module is used to specify the number of boards in the panel as well as the form and placement of break-off tabs. It is also possible to add fiducial marks, drill holes, a registration control coupon, bad marks, copper fill, assembly mask data and text to the frame of the panel.
Note: This module is only available in Macaos Enterprise for Engineers and Macaos Gallery.
Definitions
- A single-product panel is a product where multiple instances of a single-board product are arranged in an array suitable for processing in an automated component placement system (such as a Pick-and-Place machine). The scripts in the Autopanel menu may be used to quickly generate a single-product panel. See the Automatic panelization section for more info.
- A multi-product panel is a panel made up of several different single-board products. Multi-product panels may either be delivered as a panel or as individual boards. See the Multi-product panels section for more info.
Creating a panel
Use the following procedure to create a panel:
- Locate the product to panelize. Select the product in the product browser and then click on the Panel button to open the panelization module.
- Run an Autopanel script (optional). If desired, select an autopanel script by clicking on the Autopanel (gears) button. After running the script, skip to step 8. See the Automatic panelization section for more info.
- Specify the array. Click on the Panelize button to create an array. Adjust the board quantity, frame width and instance spacing as desired. You can also specify scoring, corners and copper fill in the frame.
Add boards to the panel (optional). Press Ctrl+R to show the product chooser. Drag or Double-click on a product name to add it to the panel. See the Multi-product panels section for more info.
Move, rotate and flip boards (optional). Select a portion of a board outline to move or rotate the board. Right-click or press the space bar to rotate. Press Ctrl to disable snap when moving. Click to place the board or press Esc to cancel. With the mouse pointer within an unselected board, press Space to rotate 180° or Shift+Space to flip the board upside down. - Specify break-off tabs. Break-off tabs are automatically generated when panelizing a single board (if autoplace is selected). If desired, click on the Tabs toolbar button to modify the default style and placement of Break-off tabs. For a multi-product panel, break-off tabs must be added manually.
- Place fiducial marks (optional). Click on the Fiducial marks toolbar button. Specify diameters and location, and then click on the Place button.
- Place frame holes (optional). Click on the Frame holes toolbar button. Specify diameter and location of tooling holes and/or diameter, spacing and location of break-off holes, and then click on the Place button.
- Place bad marks (optional). Click on the Bad marks toolbar button. Specify the side and style of the bad marks. Specify the location of the panel mark and the board marks, and then click on the Place button.
- Place text (optional). If desired, the Text toolbar button may be used to place text, bar code or annotation fields in the frame of the panel.
- Add assembly masks (optional). Click on the Masks toolbar button. Specify the mask layer, side and fill mode; and then click on the Place button. Draw a selection rectangle around the area where the mask is to be placed.
- Add test coupons (optional). Click on the Test coupons toolbar button. Click on the Place button and then click at the location along the outer edge of the frame where you wish to place a registration control coupon. Support for IPC-2221 test coupons is under development.
- Add remarks (options). A remark is a note attached to a location on the board. Remarks give information to manufacturers, but are not visible on the final product. Click on the Remark toolbar button and then draw a circle around the location for the remark. Enter the remark text in the dialog box.
Publish or save the product.
Macaos Gallery:
- Click on the Save toolbar button to complete panel creation.
- Select a filename and close the file selection dialog box.
- Specify drawing options and title block texts for the stackup drawing and panel drawing.
Macaos Enterprise for Engineers:
- Click on the Publish toolbar button to complete panel creation.
- Specify the product name, article number and description in the dialog box.
- Specify drawing options and title block texts for the stackup drawing and panel drawing.
- Once the product has been published, it will be visible in the Never Ordered and Recently Published folders of the Product Browser, for quotation, purchase, etc.


