To create a multi-product panel, start by selecting a product and opening the panelization module. This first product determines the stackup, colors and surface finish for the entire panel when it is saved. Additional products may be added to the panel with the File|Open... command, and then placing each opened product in its desired location.
 Note: Macaos Gallery does not check if products added to a multi-product panel are compatible with the product(s) already in the panel. The user must insure that the layer count, layer buildup, mask colors, etc for all products in the panel are compatible.
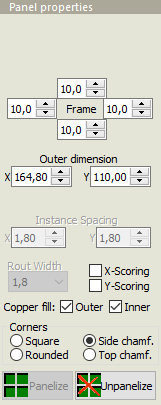
Due to the complexities that can arise with many different products on a panel, there are limitations on some of the panel properties. The route width must be specified prior to adding a second product to the panel. Instance spacing is ignored, since boards are placed manually.
Scoring may only be added in cases where all boards in a row (or column) have the same height (or width). It is not possible to select or move boards once scoring has been specified. Therefore, all boards should be placed prior to selecting X-scoring or Y-scoring.
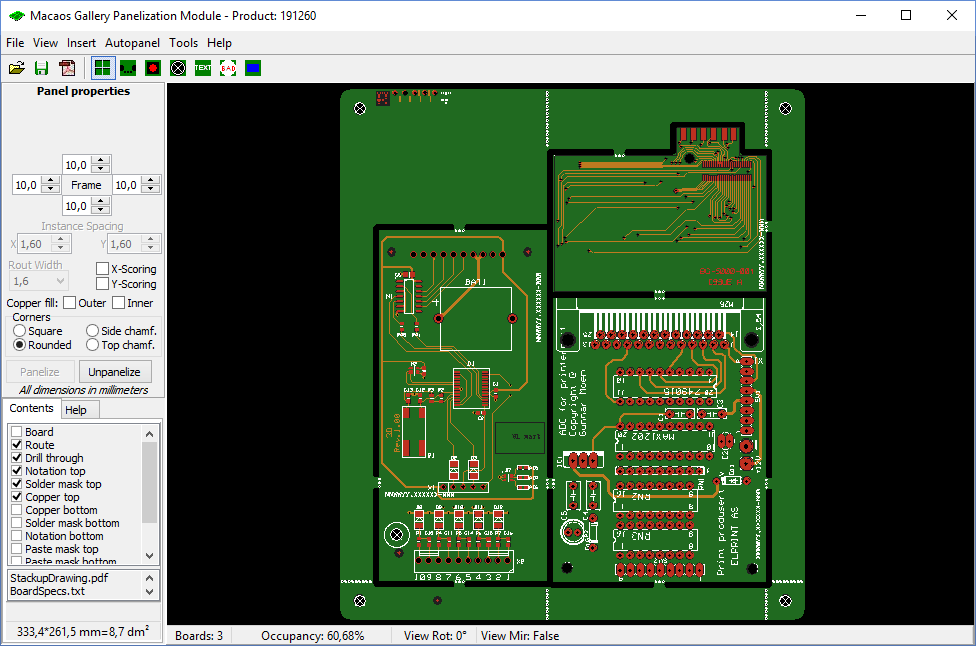
When viewing a multi-product panel, an additional Product number layer shows the placement and product number of each board in the panel. This layer is for documentation purposes only and may not be exported as a manufacturing layer.
A board may be added to a panel with the File|Open... command. The new board becomes the active board. Alternatively, a board may be copied by pressing the Ctrl key when selecting any portion of the board's contour.
The status bar at the bottom of the graphic display shows information about the active board. This information includes the board's filename, board size and rotation.
The active board follows the cursor until it has been placed. While a board is active, the following operations may be performed:
- Space Pressing the space bar rotates the board 90 degrees around the cursor.
- Ctrl Pressing Ctrl deactivates the auto-snap functionality as long as Ctrl is depressed.
- Left-click Clicking the left mouse button places the board at the current position.
- Del Pressing Del deletes the board from the panel.
- Esc Pressing Esc aborts the current operation. For a new board, the board is deleted. For an existing board, it is returned to its previous position.
- Right-click Clicking the right mouse button aborts the current operation.
When no boards are active, right-clicking opens a menu of operations that may be performed on the most recently active board. These are:
- Move Makes the board active.
- Rotate 0° Sets the board's rotation to 0°. The rotation is around the board's center.
- Rotate 90° Sets the board's rotation to 90°. The rotation is around the board's center.
- Rotate 180° Sets the board's rotation to 180°. The rotation is around the board's center.
- Rotate 270° Sets the board's rotation to 270°. The rotation is around the board's center.
To make a different board the active board, draw a selection rectangle around any portion of the board's contour. To add a new copy of an existing board to the panel, press the Ctrl key while making the board active.
Each time a board is placed, the panel is resized using the frame widths specified on the Panel Properties page. The panel size and area are shown in the bottom left corner of the window.
Note: All boards should be placed in their final positions prior to placing tabs, holes, text, etc.
Replacing a board in a panel
A board within a panel may be replaced with a different board, provided both boards have a bound box (surrounding rectangle) of the same size. This function is useful to create a panel for a new revision of a board, without changing the panel dimensions.
Use the File|Replace board in panel menu command to select the replacement board. If a board with the same bound box size is found in the panel, it will be replaced with the newly selected board.
Note: If boards in a panel have been flipped, they will not be replaced. Boards should be “unflipped” before replacing, and then flipped again after replacement.
Note: If a multi-product panel has more than one product with the same bound box size, it will only be possible to replace the first product of that size (in the list of products in the panel).