Skip to main content Skip to footer
Home
User manuals

Main navigation

  • Home
  • Enterprise for Engineers
    • Program overview
      • Getting started
      • Product browser
      • Recent activity
      • Viewer tab
        • Product viewer
      • Specifications tab
        • Product Specifications viewer
        • Product documentation
        • Product buildup viewer
        • PCBA Components
        • Product sharing
      • Quotation
      • History
      • Shopping Cart
    • File menu
    • Show menu
      • Find product
      • View mode
    • Products menu
    • Operations menu
      • Import PCB
      • Panelize PCB
      • Create Stencil
      • Add Masks to PCB
      • Assembly Data Manager
      • Solder Pallet Designer
      • Depanelize PCB
      • Test Fixture
      • Test Fixture (legacy)
      • Connector chooser
      • Import 3D Mechanical Part
      • Order History
    • Configuration menu
      • Partner manager
      • User details
      • User manager
      • Options
      • Move ME to new PC
    • What's new
    • Release notes
  • Enterprise for Purchasers
    • Activity Overview
    • Product details
    • Search for product
    • Additional Operations
      • Partner manager
      • User profile
      • User manager
      • Options
  • Macaos Gallery
    • Product Browser
      • Product Explorer
      • Simple PCB Editor
        • Product operations
        • Edit operations
        • DRC report
      • Exporting product data to Gerber
      • Searching for products
      • MIF File history
      • Icon bar
      • Product info
    • Operations
      • Standard operations
        • Import PCB
        • Panelize PCB
        • Create Stencil
        • Add Masks to PCB
      • EMS version operations
        • Assembly Data Manager
        • Solder Pallet Designer
        • Depanelize PCB
        • Test Fixture
    • Technical Documentation
    • Configuration
    • Gallery PreCAM
      • Configuration options
      • Quotation module
        • Quotations
        • Calculated prices
        • Adjusting prices
        • Quotation
      • Quotation archive
        • Folders
      • Price Editor module
      • Price list editor
        • Price element editor
        • Selector editor
        • Curve editor
        • Price list wizard
      • Sales office settings
      • Holidays
      • About prices
        • Factory price
        • Retail price
        • How is a price calculated?
      • Reference
        • Price list
        • Price element
        • Curve function
        • Parameters
      • Example: Creating the Demo price list
        • Using the price list wizard
        • Refining the price list
        • Retail price
    • What's new
    • Release notes
  • Macaos Convergence
    • Using MC as a supplier
      • RFQs
      • Work orders
      • Status
      • Outgoing shipments
    • Using MC as a seller
      • Incoming orders
      • RFQs
      • Work orders
      • Status
      • Outgoing shipments
    • Reference
      • Mileposts
        • Seller mileposts
        • Receive
        • Production progress
        • QA
        • Pack/Ship
      • Create RFQ
      • Quotation viewer
      • Create/edit work order
      • Quotation response mail
      • Forwarding a quotation
      • Shipment details
        • UPS WorldShip export
  • Subsystem Manuals
    • Product editor Modules
      • Assembly Data Manager (ADM)
      • Assembly Masks
      • Depanelization
      • Import PCB
      • Mechanical Parts
      • Panelization
      • Solder Pallet
      • Solder Paste Stencils
      • SPRINT Test Fixtures
      • Test Fixtures (Legacy)
    • Product display modules
      • PCBA Components
      • Product Buildup Viewer
      • Product History
      • Product Specifications Viewer
      • Product Viewer
    • Other Modules
      • Connector Chooser
      • Order History
      • Order Status
      • Partner Manager
      • Product sharing
      • Quotation
      • Search
      • Shopping Cart
      • User Details
      • User Manager
  • Additional info
    • Release notes
      • What's new in ME for Engineers
      • What's new in ME for Purchasers
      • What's new in Gallery
      • What's new in Convergence
      • ME for Engineers release notes
      • ME for Purchasers release notes
      • Gallery release notes
      • Convergence release notes
    • Gerber file generation tips
      • Using Altium
      • Using CADint
      • Using Eagle
      • Using KiCad
      • From other systems
    • Performance Classes
    • Solder paste stencil ratios
    • Surface finishes
    • Via types
    • Panelization scripts
  • Contact
  • Macaos website (opens in new tab)

Pack/Ship

Breadcrumb

  • Home
  • Macaos Convergence
  • Reference
  • Mileposts
  • Pack/Ship
Packing and shipping module

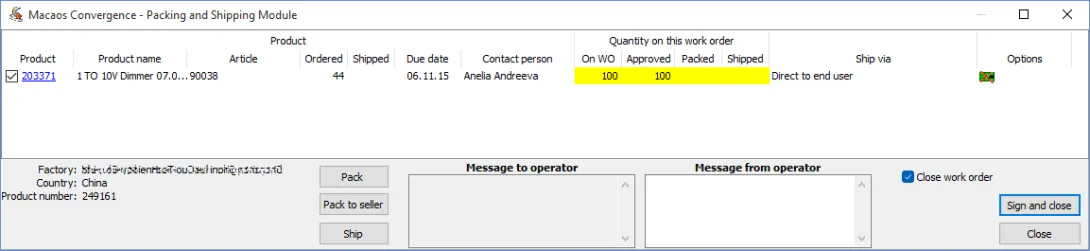
The Pack/Ship milepost opens the Packing and Shipping module, which is used to generate packing documents and to enter shipment tracking numbers.

Each customer order in the work order is listed with order details as well as quantities on the work order. The quantity cells are color coded, to indicate the status for shipment:

  • Green: There are enough boards packed or in stock to fulfill the order
  • Yellow: There are enough boards approved to fulfill the order

The packing and shipping module is used to manage packaging and shipping of the products in a work order. This is done in two steps:

  • Packing: For each product/order, four kinds of documents are generated:

    • one or more labels for the vacuum packages
    • a package content label
    • a packing list
    • a shipping address label

    The specified quantity of boards are marked as Packed in the database.

  • Shipping: For each packing list, the carrier's tracking number must be entered. Once this is done, the items are marked as Shipped in the database.

The module uses an internal rule set to determine whether the customer order should be sent directly to the end user or not. This may be changed by right-clicking on a row and choosing Toggle ship via.

The options column shows icons for packing/shipping related order options. These indicate additional requirements when packing and shipping.

A red field in the Ship via column indicates that there are special shipment instructions for that order. Hold the mousepointer over the red field to view the instructions.

Packing

Note: Prior to packing products, be sure that your label printer has been configured. This may be done with the Configure|Select printer for printing packing labels printer menu command.

Quantity to pack
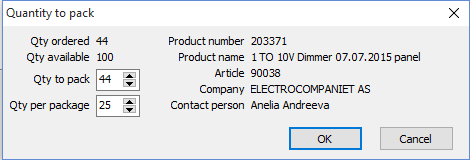
When clicking on the Pack button, only customer orders whose check box has a check mark, and which have Approved but unpacked boards will be processed. For each customer order, the quantity to package and the quantity per vacuum-package should be specified. The following documents are generated:

  • A vacuum-package label with a unique package number for each vacuum-package
  • A package content label with bar codes for the product number and article number (if any)
  • An address label for each recipient
  • A packing list for each recipient

Note: If the quantity packed is less than the quantity approved, the user will be asked whether or not to delete the unpacked items. Items which will be discarded must also be deleted from the system. If, however, the items will be stored for later shipment, they should not be deleted.

Note: A number is usually printed in the upper right corner of the address label. This is the number of days between the date the label was printed and the due date. This number may be used to choose between a slower (lower cost) or a faster (higher cost) shipping method. A negative number indicates a late shipment. If no number is printed, then the label was printed on or after the due date.

The Pack to office button packs all remaining boards and ships them to the sales office (even if they would otherwise have been shipped directly to the customer).

Shipping

Once the package is complete, click on the Ship button to open the Shipment details module. Double-click on each packing list number to enter the carrier's (UPS, DHL, etc) tracking number (or waybill number).

Once all boards have been shipped, click on the Sign and close button to sign the milepost.

Milepost messages

By clicking on a milepost assigned to another organization, you can enter a message to the operator for that milepost. It is also possible for the operator to enter a message when signing a milepost.

If a milepost has a message, this is indicated by the use of bold text in the milepost.

Book traversal links for Macaos Convergence

  • ‹ QA
  • Up
  • Create RFQ ›

Macaos Software AS
Sanddalsringen 5b
N-5225 Nesttun
Norway

Download gerber specification
ODB++ partner
IPC member

Footer menu

  • Contact
  • Privacy policy
Powered by Drupal

Copyright © 2026 Macaos Software AS - All rights reserved