Skip to main content Skip to footer
Home
Image not available
User manuals

Main navigation

  • Home
  • Enterprise for Engineers
    • Program overview
      • Getting started
      • Product browser
      • Recent activity
      • Viewer tab
        • Product viewer
      • Specifications tab
        • Product Specifications viewer
        • Product documentation
        • Product buildup viewer
        • PCBA Components
        • Product sharing
      • Quotation
      • History
      • Shopping Cart
    • File menu
    • Show menu
      • Find product
      • View mode
    • Products menu
    • Operations menu
      • Import PCB
      • Panelize PCB
      • Create Stencil
      • Add Masks to PCB
      • Assembly Data Manager
      • Solder Pallet Designer
      • Depanelize PCB
      • Test Fixture
      • Test Fixture (legacy)
      • Connector chooser
      • Import 3D Mechanical Part
      • Order History
    • Configuration menu
      • Partner manager
      • User details
      • User manager
      • Options
      • Move ME to new PC
    • What's new
    • Release notes
  • Enterprise for Purchasers
    • Activity Overview
    • Product details
    • Search for product
    • Additional Operations
      • Partner manager
      • User profile
      • User manager
      • Options
  • Macaos Gallery
    • Product Browser
      • Product Explorer
      • Simple PCB Editor
      • Exporting product data to Gerber
      • Searching for products
      • MIF File history
      • Icon bar
      • Product info
    • Operations
      • Standard operations
        • Import PCB
        • Panelize PCB
        • Create Stencil
        • Add Masks to PCB
      • EMS version operations
        • Assembly Data Manager
        • Solder Pallet Designer
        • Depanelize PCB
        • Test Fixture
    • Technical Documentation
    • Configuration
    • Gallery PreCAM
      • Configuration options
      • Quotation module
        • Quotations
        • Calculated prices
        • Adjusting prices
        • Quotation
      • Quotation archive
        • Folders
      • Price Editor module
      • Price list editor
        • Price element editor
        • Selector editor
        • Curve editor
        • Price list wizard
      • Sales office settings
      • Holidays
      • About prices
        • Factory price
        • Retail price
        • How is a price calculated?
      • Reference
        • Price list
        • Price element
        • Curve function
        • Parameters
      • Example: Creating the Demo price list
        • Using the price list wizard
        • Refining the price list
        • Retail price
    • What's new
    • Release notes
  • Subsystem Manuals
    • Product editor Modules
      • Assembly Data Manager (ADM)
      • Assembly Masks
      • Depanelization
      • Import PCB
      • Mechanical Parts
      • Panelization
      • Solder Pallet
      • Solder Paste Stencils
      • SPRINT Test Fixtures
      • Test Fixtures (Legacy)
    • Product display modules
      • PCBA Components
      • Product Buildup Viewer
      • Product History
      • Product Specifications Viewer
      • Product Viewer
    • Other Modules
      • Connector Chooser
      • Order History
      • Partner Manager
      • Product sharing
      • Quotation
      • Search
      • Shopping Cart
      • User Details
      • User Manager
  • Additional info
    • Release notes
      • What's new in ME for Engineers
      • What's new in ME for Purchasers
      • What's new in Gallery
      • What's new in Convergence
      • ME for Engineers release notes
      • ME for Purchasers release notes
      • Gallery release notes
      • Convergence release notes
      • Perception release notes
    • Gerber file generation tips
      • Using KiCad
      • Using Eagle
      • Using CADint
      • From other systems
    • Performance Classes
    • Solder paste stencil ratios
    • Surface finishes
    • Via types
    • Panelization scripts
  • Contact
  • Back to Macaos website

Split or edit openings

Breadcrumb

  • Home
  • Solder paste stencils
  • Split or edit openings

Split or edit openings
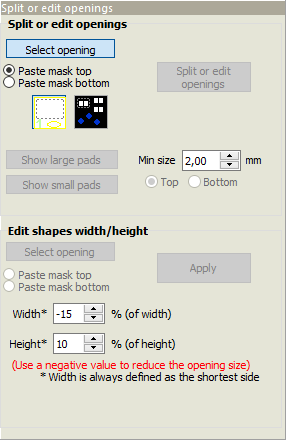
Often it is desirable to split a large stencil opening into an array of smaller openings. This can give better control over the total amount of solder paste deposited on a large pad.

Choose a layer and then use the left mouse button to draw a selection rectangle around the opening to split. (You may only select one opening.) Only openings on the chosen layer are selected. The selection modes are described in the Graphic display section.

You can use the Highlight large pads button to help you locate pads that should be split. All pads whose width and height are larger than the Min size value will be highlighted.

Note: You may select only one opening to edit. If you select more than one pad, or if an opening is made up of several overlapping graphic objects, then you may choose to treat the selected objects as a single rectangle surrounding all selected objects. In such cases, it may afterwards be necessary to delete some of the small openings created by the split operation.

Split or edit stencil opening

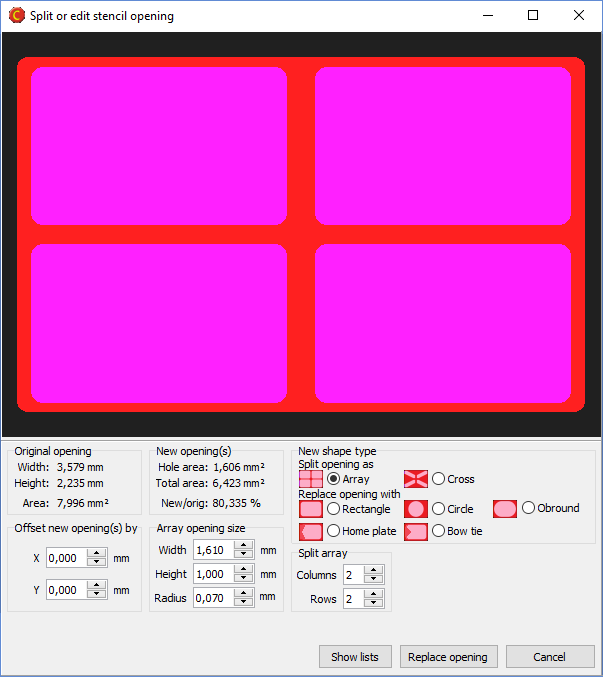
Once the desired openings have been selected, click on the Split or replace openings button to open the Split or replace stencil opening editor. The un-split opening is shown in red and the new openings are shown in magenta.

Note: The red opening is the un-split opening size, not the copper pad size.

You may choose between several options to split or replace the pad. For each New shape type you may specify the size and placement of the replacement openings to meet your specific needs.

The Original opening and New opening(s) statistics calculate how your proposed changes will affect the opening size (and thereby the amount of solder paste) for the pad.

Once you are satisfied, click on the Replace opening button to replace the selected opening(s).

Edit shapes width/height

If necessary, the height and width of individual stencil openings may be adjusted.

Choose a layer and then use the left mouse button to draw a selection rectangle around the openings to adjust. Only openings on the chosen layer are selected.

Specify the desired width and height adjustments as a percentage of the original width/height and then click on the Apply button.

Note: For purposes of this operation, the width is always the shortest dimension of the opening, regardless of whether the “width” is horizontal or vertical. In the same manner the height is always the longest dimension of the opening.

Book traversal links for Split or edit openings

  • ‹ Fiducials
  • Up
  • Text and identification ›

Macaos Software AS
Sanddalsringen 5b
N-5225 Nesttun
Norway

Download gerber specification
ODB++ partner
IPC member

Footer menu

  • Contact
  • Privacy policy
Powered by Drupal

Copyright © 2025 Macaos Software AS - All rights reserved