Opening the BOM source file
Click on the Import button in the Bill of materials actions toolbar to select a BOM file for import. Alternatively, click on the small down-arrow in the lower right corner of the button to import a file which is already attached to the product.
A spreadsheet file is loaded directly into the Import BOM module.
When importing a text file, the format (character encoding, column delimiter, escape/quotation character, number and date format, and first row of actual data) must first be specified. If you don't get these right, close the Import BOM module and try again.
It is also possible to copy cells from an open spreadsheet directly into the Source BOM file grid (by right-clicking the cell that will become the top left corner of the pasted data).
Individual cells in the Source BOM file grid may be edited, if necessary, by clicking on a cell and entering the desired text. You can change the text in an entire column, or in selected cells, by right-clicking on the grid. It is also possible to add an extra column to the source grid (for example, to add mounting style data).
The Rearrange cells functionality (right-click on source grid) is used to restructure known BOM source files which do not follow the single row per component convention. If your BOM generator creates files with an unsupported structure, you can send a few example files to us at support@macaos.com.
Parsing the source data
To process the source data, do the following:
- If necessary, specify the number of header rows to ignore, and the prefix character for comment lines to ignore.
- Where possible, the column contents are automatically identified. (This may not always be accurate, so automatic column mappings should be checked.)
The Clear mapping or Retry mapping buttons may be used to help clear up inaccurate column mappings. - Specify the input column mapping for the remaining output fields by clicking on source column headers and selecting the column contents. For the Value, Package, Description, and Additional info output columns, multiple input columns may be mapped. This is also true for the Supplier/SKU fields and the Alternate MPN/Manufacturer fields.
- Specify parameters for individual columns, as necessary.
Designator: If the designator field lists multiple designators, specify the separator character (typically a comma, semicolon or space). The import module automatically converts designator ranges like C2-4 or C2..4 to individual designators (C2, C3 and C4). Set a check mark on Allow – or .. in designator to prevent designator range conversion.
Value: Any number of source columns may be mapped to the Value column. The contents of the source columns will be concatenated, separated by a space character.
Description: Any number of source columns may be mapped to the Description column. The contents of the source columns will be concatenated, separated by a space character.
Mounting style: If a column is mapped, you must specify an SMD text and a Thru-hole text. Components which match one of these texts will be assigned a mounting style of SMD or TH (respectively). The mounting style will remain unassigned for components which do not match.
If no column is mapped, you may select a default mounting style, which will be applied to all components (except connectors). A separate default style may be specified for connectors.
Do not place: Specify a Do not place text. Components which match this text will be marked as not to be installed.
Additional info: Any number of source columns may be mapped to the Additional info column. The contents of the source columns will be concatenated to the component’s Original description property, separated by a space character. (The Original description property is the normally the component description imported from Pick and Place data.)
Supplier name and SKU: Supplier names and SKUs must be paired. They can be taken from a single source column or from pairs of source columns. If there are multiple values in a column, then a delimiter text must be specified. Typical delimiters are comma, semicolon or space.
- If the supplier name and SKU are in a single column, specify the source column as the Supplier SKU column and specify the character that separates the names and SKUs. (The supplier name column must not be mapped.)
For a single pair, the column content must be Name<delimiter>SKU.
For multiple pairs: Name<delimiter>SKU<delimiter>Name<delimiter>SKU... - If the source has separate columns for supplier name and SKU, specify both source columns. If each column has multiple values, then specify the character that separates the values. It is also possible to map multiple pairs of columns.
Alternate part numbers: Manufacturer names and MPNs must be paired. They can be taken from a single source column or from pairs of source columns. If there are multiple values in a column, then a delimiter text must be specified. Typical delimiters are comma, semicolon or space.
- If the alternate manufacturer name and part number are in a single column, specify the source column as the Alternate MPN column and specify the character that separates the names and SKUs. (The Alternate manufacturer column must not be mapped.)
For a single pair, the column content must be Name<delimiter>MPN.
For multiple pairs: Name<delimiter>MPN<delimiter>Name<delimiter>MPN... - If the source has separate columns for manufacturer name and MPN, specify both source columns. If each column has multiple values, then specify the character that separates the values. It is also possible to map multiple pairs of columns.
It is possible to edit the text in the Parsed BOM grid, by clicking on a cell and entering the desired text. You can change the text in an entire column, or in selected cells, by right-clicking on the grid. Note: Any edits made to the parsed grid will be lost if any of the column mappings, column parsing parameters, or source grid contents are changed.
Check off for Save settings to store column mapping and parsing parameters as default values for future BOM import. Click on the Clear stored settings button to reset all column mapping parameters and default values.
Importing BOM data
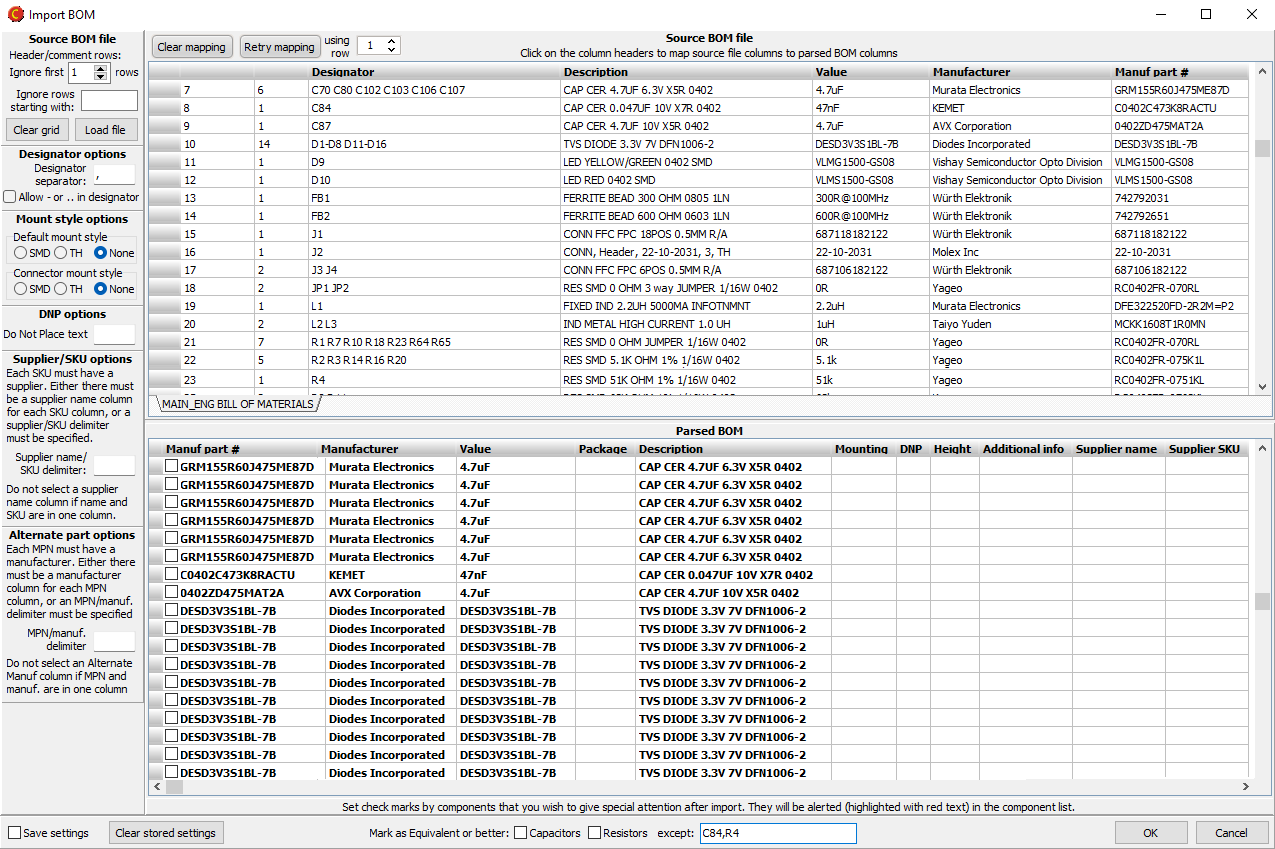
If there are components that might need further attention after import, set a check mark by each of them. This will create a component alert, and the component will be highlighted with red text in the component list. Note: Component alerts are not saved with the product. You should resolve all alerts before closing the ADM.
Components may be automatically marked as allowing equivalent or better alternates to the specified manufacturer part number if any of the Mark as Equivalent or better boxes are checked. By default, all components of the specified type(s) will be marked. To exclude components from being so marked, their designators should be listed in the except list, separated by commas (without spaces).
Once the data format has been correctly specified, click the OK button to import the data.
Components in the BOM which do not already exist on a component layer are automatically placed in a 10 mm grid to the left of the PCB. These should be moved to their correct location.